Tuesday, December 27, 2011
Softness and Hardness in the Details
Just a reminder, the videos towards the top are newer, and the older ones are below. So if you want to start at the very beginning, go all the way to the bottom, click on older posts, and keep going down until you get to the beginning!
Sunday, December 11, 2011
Wednesday, November 23, 2011
The First Wash...

There are SO many ways to start a painting. This video shows me doing the background first by dropping color onto wet paper. The main subject, a bird, was kept dry so that the colors wouldn't drift onto that area of the painting.
When this painting was almost dry, I spritzed a little water on it to create texture in the background...
Here's the image for this second demonstration:

Here's another example of a first wash...
And a note about the importance of letting your painting completely dry between layers.
Sunday, November 20, 2011
How to prepare your palette before a painting
Please note, the very first post is at the bottom of the page, and the newest posts are at the top. Please leave a comment or email me at rachel6parker at gmail dot com if you have a question or comment!
The following video explains how to prepare your palette before you start painting.
The following video explains how to prepare your palette before you start painting.
Friday, November 11, 2011
Starting a Painting
The very first step of painting is choosing a good picture. I highly recommend using a good picture with good light in it. For example, this picture has beautiful light:
 It's got natural light, illuminating the subject from the side, there was no flash, and the picture was taken at eye level of the subject so it's not an ugly angle. Often, pictures taken at the 'golden hour' when the sun is low relative to the horizon, have good light.
 This picture above is not a great picture to use to paint from. The flash has flattened out the contours, and the child is sitting in an odd position with his arms straight (straight lines=boring). If you want to send me your picture before you start, feel free to do so!
Another thing to consider when you're first beginning a painting, is composition. It's usually best to put the subject in one of the four corner quadrants of the picture, not right in the middle of the painting. Making things a little off balance by moving the subject out of the center of your paper will add interest. Sometimes, the center of interest may be the eye of the animal, and even though part of the face may be in the center of the picture, this can still work well. For example, in the picture below, the cats face falls right in the middle of the painting. But the center of interest, the eyes are right and above of center, and makes this painting work.

Once you have selected your picture, you can either draw it on your paper (I recommend 190 lb arches cold pressed paper) or trace it on using either a light box or the light through a window, a print out of the picture, and your watercolor paper. After you have transferred your drawing to your paper, whether you draw it or trace it on, you will want to use mask to save the most important small areas of whites, like whiskers or a glint in the eye. Here are two videos that show you a little bit more about mask and how to work with it.
The following video provides a little tip on how to keep your brushes from getting ruined from mask.
The next step, which you can do before or after you use mask (and you may decide not to use mask), is to tape down your paper...That will be the next post!
Tuesday, November 1, 2011
A little about contrast and detail...
Contrast – The human eye is naturally drawn to contrast, and it’s important to keep this in mind when you’re painting. Contrast can be used in many different ways – lots of contrast can create energy and interest, and very little contrast can result in a soothing feeling of relaxation. In my paintings, my subject is usually an animal, and I use contrast to draw the viewer in to the eye of the animal, usually. So I make sure I have some contrast in that area, usually through a dot of white on a dark eye. It’s also important to use contrasting tones and colors to delineate your subject. Take a look at Leonardo Da Vinci’s use of contrast. He really punched up contrast to enhance the planes of his subject, pronouncing the light and drawing attention to his subject. Often, the center of interest also had the highest about of contrast.

Look, for example at this painting, and how Leonardo used light to draw your attention to the face of this subject. Notice that the highest area of contrast is the very dark hat near the very light side of the man’s face. The lower portion of the man’s body is delineated, but there is very little contrast between the body of the man and the background. This naturally draws your eye to look at the man’s face.
Detail - In this painting, detail has been made to be the subject. This painting is proof that once you know the rules, you can break them in a well planned painting.

Click on the image to see a larger version
Thank you Steve Mills, for the use of your painting!
There is equal amounts of detail throughout this painting, but it still works. In more traditional compositions, artists use detail to direct the eye to the main point of interest in the painting. In a large majority of my paintings, that point is the eye of the animal. I keep that area sharp and detailed, and soften the other areas of the painting, even if subtly, to direct attention to the eye.
Saturday, October 29, 2011

Monday, October 24, 2011
Materials and Resources
*Note - Anytime you see text underlined in a different color, you can click on that text to go to the website of that item.
I'm really excited to start "Learn Watercolor" I want to make this accessible to beginners, but also hopefully this will provide a great refresher for many levels of watercolor artists. First, you may want to take a look at my supplies list. These are some of my favorite tools:
http://www.rachelsstudio.com/supplyList.html
To get started, you will need a few basics for your setup. You'll need:
* Medium size rinse bowl with water
* Watercolor Paint - I recommend professional quality paint because the colors will be richer, more manageable, and archival. You'll need at least a blue (Ultramarine) red (Napthol Red, see list) and yellow (Aureolin) (I still haven't found a FAVORITE yellow, but I can't live without Ultramarine and Napthol). For a great resource about watercolor paint visit handprint.com . This site can be a bit overwhelming but the breadth and depth of the information is amazing!
* Watercolor Paper - I advise Arches Cold Pressed 140 lb. If you buy cheap paper, you will get horrible results. Arches Cold Press stands up better than most papers to some scrubbing, takes layers of paint nicely, and doesn't dry so quickly that you can't work with the paint for a bit.
* Mr. Clean Magic Eraser Pads - found in your grocery store cleaning aisle (great for mistakes)
Masquepen (see my online list, link is above)
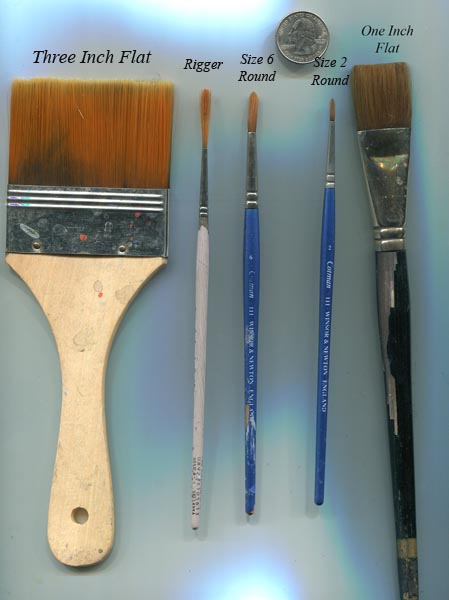
* Watercolor Brushes - you don't necessarily need to get natural hair, expensive brushes, but it is good to have one or two brushes that make a good pointy tip. I still haven't found a PERFECT small brush. I do like Alvaro Castagnet's brushes, but they may be too pricey for the beginner. Do get a nice large flat brush that you can wet large parts of your painting with, and get a size 1 or 0 for details, a rigger, and a medium size round brush that has a nice point.

These are the basic brushes you need - a good 2-3 inch flat to get large areas wet; a rigger for fine lines; a small round; a REALLY small round (size 1 or 0); and a one inch flat.

I'm really excited to start "Learn Watercolor" I want to make this accessible to beginners, but also hopefully this will provide a great refresher for many levels of watercolor artists. First, you may want to take a look at my supplies list. These are some of my favorite tools:
http://www.rachelsstudio.com/supplyList.html
To get started, you will need a few basics for your setup. You'll need:
* Medium size rinse bowl with water
* Watercolor Paint - I recommend professional quality paint because the colors will be richer, more manageable, and archival. You'll need at least a blue (Ultramarine) red (Napthol Red, see list) and yellow (Aureolin) (I still haven't found a FAVORITE yellow, but I can't live without Ultramarine and Napthol). For a great resource about watercolor paint visit handprint.com . This site can be a bit overwhelming but the breadth and depth of the information is amazing!
* Watercolor Paper - I advise Arches Cold Pressed 140 lb. If you buy cheap paper, you will get horrible results. Arches Cold Press stands up better than most papers to some scrubbing, takes layers of paint nicely, and doesn't dry so quickly that you can't work with the paint for a bit.
* Mr. Clean Magic Eraser Pads - found in your grocery store cleaning aisle (great for mistakes)
Masquepen (see my online list, link is above)
* Watercolor Brushes - you don't necessarily need to get natural hair, expensive brushes, but it is good to have one or two brushes that make a good pointy tip. I still haven't found a PERFECT small brush. I do like Alvaro Castagnet's brushes, but they may be too pricey for the beginner. Do get a nice large flat brush that you can wet large parts of your painting with, and get a size 1 or 0 for details, a rigger, and a medium size round brush that has a nice point.
These are the basic brushes you need - a good 2-3 inch flat to get large areas wet; a rigger for fine lines; a small round; a REALLY small round (size 1 or 0); and a one inch flat.

These are more specialized brushed that I find handy to have. The stiff hogs hair oil painting brush is good for scrubbing. The fur painting brush is good for just that (see my supplies list for a link to this brush). The squirrel hair round pictured here is my expensive Alvaro Castagnet brush. It absorbs a lot of water, makes many different marks, and has a nice point. The fan brush is good for fur or landscape textures. The firm craft brush is good for scrubbing paint in your palette to get it ready to paint with, and it also has some good textural effects.
* Palette - I use a plastic palette that I bought off DickBlick.com. I think the most important thing is for it to be white so you can see the colors you're working with. If you are not sure you'll keep up with the watercolor you could even use cheap white Styrofoam plates.
* Support for painting on - I use lightweight, inexpensive gatorboard or foam core board used for framing. You can often find a good deal on foam core board on eBay.
* Duck Brand Masking Tape - This is the tan tearable tape. The brand that I have found that works best is carried by Walmart. I use it to tape my paper to my foam core board. Duck Brand is better than Scotch brand, and cheaper. It doesn't let the paint seep under the tape as much as Scotch does.
* Paper Towels - Can't live without them!
*A photo editing software - This is not completely necessary, but as you advance more, it is so helpful to have a tool that you can use to lay out a painting, crop it, change colors, erase and add in things to compose the painting before you even start. Don't have photoshop? The next best thing is pixlr . Pixlr is a free program that has many of the functionalities of Photoshop for free. It is beyond the scope of this tutorial to teach all the ins and outs of using these types of programs, but they are invaluable tools to an artist!
* Scanner or camera - Again, these are not completely necessary, but if you want to share your work with the world, you'll at least need a digital camera. A scanner is the best way, at least for smaller paintings, to capture your painting digitally. You can also take your work to a professional photographer but that can get pricey. There are many wonderful tutorials on the web about how to take good pictures of your work, so I'll leave it to them to teach that part of the artistic process.
* An artistic community - It is very useful for a new artist starting out to join an artistic community. There are several where you can get people to give you pointers on your art, art in general, and provide information and advice on everything art. A really thorough one is wetcanvas. You could spend months there reading all the tutorials and forums, and even more months socializing and gabbing with artists all over the world. I highly recommend it! Etsy, eBay, and Facebook have also all provided great resources to me for finding new artists to network with. It can also be fun to get involved with a blog where you can present your work and see that of others. A great one is The Virtual Paintout . You paint landscapes found in Google Streetview, then submit them to the blog. Everyone's art is shown, and it's another fun way to get your work seen by a lot of people, and get to know other artists. Of course, your town probably also has several places to meet other artists face to face. Artist Guilds, local frame shops, galleries, community centers, art stores, and local colleges are all great paces to get hooked into your local arts community. Attending art openings and gallery events provide another fun way to network and meet like minded people.
A word about your work space: You can make almost any space work for painting, but here are the preferable conditions: Choose a place with decent light, a desk or table, comfortable chair. It would be good to have a place to set up your materials where you will not have to put everything away each time you complete a session. That way, you can just sit right back down and get going instead of re-setting things up each time.
The right attitude - The most important tool any artist has is their own sense of self and artistic motivation. We all start painting for different reasons: You may need to have some 'me' time, you may be looking for extra income, or perhaps you have some personal issues you want to work through using art. What ever your reason, art is a wonderful medium to express yourself and meet many different kinds of personal and professional goals. It is important to be patient with yourself; even if you've painted for a long time, not every painting will turn out to be the masterpiece you envisioned. It takes time, practice, and courage to create the painting you envision. Some painting days may be very discouraging. Don't give up. The beautiful thing about painting is that it can be a lifelong journey of learning and discovery. If you are persistent, you will always have break throughs that amaze you. But there will also be bumps along the way where you ask yourself "What made me think I could do this?" Ignore that voice and push on. Because most likely, the next day you'll find your answer and create something that impresses yourself! It's funny, I find that when I am most scared and intimidated by a painting, the better it comes out. But when I'm a bit too self-assured, it'll come out looking like something a 2 year old produced. Painting definitely keeps you humble! So take risks, be brave, and paint another day! Allow yourself mistakes and you'll become a better painter. I promise! If you have any kind of artist's block or fear of creating, I highly recommend "The Artists's Way" by Julia Cameron.
Here are some other books that are very useful and insightful:
"How to Make a Watercolor Paint Itself" by Nita Engle
"Making Color Sing" by Jeanne Dobie, AWS
"Transparent Watercolor Wheel" by Jim Kosvanec
Anything by Charles Reid
The "Splash" series; a new book comes out every two years. It's great for inspiration!
I also recommend that you go to your local library and get ideas from the many books they have.
Subscribe to:
Posts (Atom)